
Travel
First time in Kedarkantha in winters
introduction
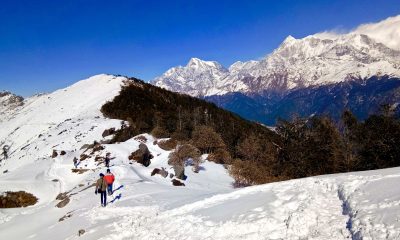
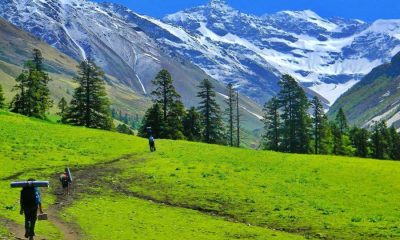
Here are 5 reasons to do the Kedarkantha trek in winter: Not many people know that it will snow by April, but on the Kedarkansa Trek, the winter snow starts in his mid-December and lasts until the third week of April. Above 10,000 feet in elevation, you may encounter snow as you lie on the pine forest floor. Once you reach the meadow, chances are you are surrounded on all sides by a vast blanket of white.
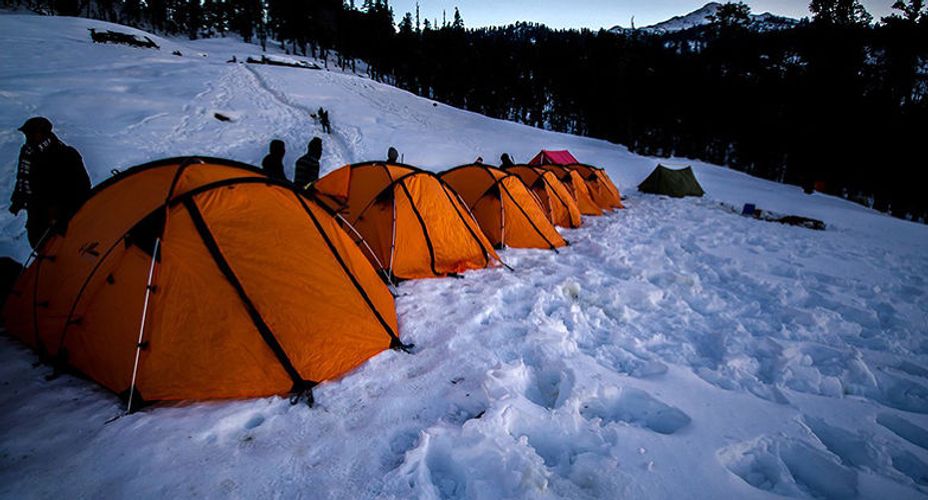
Most Beautiful Campsites
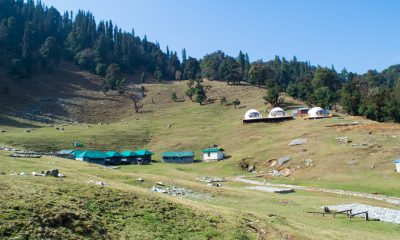
This trek has some of the most beautiful campsites in the Himalayas. Not every trek can boast of the beauty of a campsite like the Kedarkantha trek. Each campsite is unique in its beauty. The Juda Ka Talab campsite is located in a clearing surrounded by giant pine trees, the Kedarkantha Base campsite is in an open meadow surrounded by snow-capped mountains, and the Hargaon campsite is in a clearing of pine and oak trees. is in It’s almost as if they are competing against each other in beautiful surroundings.
Himalaya’s Best Drive
The drive to Kedarkantha goes through Mussoorie, Nougaon, Prora, Moli, and Nightwear. It is a very exquisite remote route and one of the most scenic drives in the Indian Himalayas. Be especially careful on the section from Purora to Sankuri at Base Camp.
The Joy of Walking on a Carpet of Brown Leaves.The Kedarkantha trek begins in a dense pine forest. The road is always covered with a carpet of brown leaves. It’s a crunchy treat when you walk on it!
Snow Peak
This is a great advantage of trekking in Kedarkantha. Directly from Kedarkantha Base Camp, you can admire his breathtaking 360-degree views of the famous peaks surrounding him.
When you reach Kedarkantha Peak, you feel like you’ve touched the sky, with all peaks at eye level.
About the Kedarkantha Trek in Sangkuri: Here are some quick details about the
Kedarkantha Trek:
Difficulty: Medium difficulty. No trekking experience is required.
Trail type: circular trail. The trek starts and ends in Sangkri.
Region: Uttarakhand
Railhead: Dehradun is the closest railhead to base his camp.
Elevation/ElevationElevationElevation: The hike starts at 6,000 feet and climbs to 12,500 feet.
Base Camp: Sangkuri (10 hours drive from Dehradun)
Campsites: Judah Katarab, Kedarkantha Base, hurgaon
Best Season: Winter. Expect plenty of snow from mid-December through late April.
Please be aware that Himalayan winters can be unpredictable. The weather can get a little tricky as temperatures drop to about -10 degrees Celsius. So if you plan to travel in the Himalayas in winter, make sure you have plenty of winter gear, at least 5 layers.
BEST TIME TO GO
Kedarkantha is perfect for winter hiking from December to April. These months are pure snow hikes. On the first day of the trek from Sangkuri to Judah, Ka Talab sees the first snow.
Kedarkantha is also one of the few hiking trails accessible in winter.
The Himalayas are not always accessible in winter. Too much snow on most trails can make the weather out of control and make the entire trek inaccessible. But Kedarkantha promises a decent amount of snow while giving you access to peaks as high as 12,500 feet. Standing on the top of the mountain at sunrise feels like heaven. The beauty of majestic mountains all around you and the amazing golden light harmonize as if you were from another era. It is a sight beyond all superlatives.
December to January
Daytime temperatures range from 13 to 18 degrees Celsius.
Temperatures can drop as low as -7 degrees Celsius after sunset.
The higher you go, the colder it gets. Kedarkantha’s base also has a cold wind blowing in his camp. Therefore, please prepare enough warm clothes.
March to May
Daytime temperatures range from 16 to 20 degrees Celsius.
Temperatures drop to 3-4 degrees at night and can drop to 0 degrees with snow.
Summer vacation is also the best time for Kedarkantha he trek, given that there is snow until April. This hike is categorized as intermediate, so it’s also suitable for children.
Difficulty
Kedarkantha was rated as an easy hike in the summer and a moderate hike in the winter. What does that mean?
So first things first. When trekking in the Himalayas, the main factors that help determine the difficulty of the trek are: Evacuation
How wide is the trail / can you see clearly?
What is the gradient (up and down) of the hike?
That means an altitude gain of 6,500 feet in a 4-day trek. On average, it climbs about 1,500 feet each day. This corresponds to the amount of altitude gained in one day. Most of the Indian Himalayas involve forced ascents of over 2000-3000 feet daily. However, the trek to Kedarkantha climbs at a comfortable pace, rising only about 1500 feet each day.
The trail is easy from the terrain. From Sangkuri to Kedarkantha Base, the road passes through a beautiful forest. Most of it is forest floor with crispy brown leaves that are fun to step on! This forest floor serves as a guide for his first two days of hiking, after which he begins hiking on snow.
The trail is well-signposted and easy to walk even if you are traveling alone. Climbing Kedarkantha Peak can be a bit challenging without a guide in the snowy winter months, but with a clear view of the target, there’s no chance of getting lost.
Kedarkantha is very low in difficulty when compared to some of India’s most demanding treks such as the Rupin Pass trek and the Gochara trek. So if you want to trek the Himalayas in winter but it’s your first time, do the Kedarkantha trek.
Risks and Precautions
Kedarkantha Trek doesn’t come with too many risks.
Snow
Of course, if you go hiking in winter, you can see a lot of snow in the Himalayas. In winter, snowy scenery from the first day of climbing! So I wear micro spikes and spats. This gives a better grip on the snow and prevents slipping.
Climb
Kedarkantha The trek may be easy, but unlike flat trails, it requires a lot of ups and downs. Just 30 minutes of constant ascent can be exhausting. So bring your trekking poles. The trekking pole acts as his third leg, greatly reducing the strain on his legs. You can save up to 40% of energy. It also improves balance and stability. Make your hike more comfortable. The method is as follows.
Ascend Altitude
The only thing to watch out for is ascending altitude wisely. On the first day, the distance from Sakurai to Judah Ka Talab is about 800m, so hike slowly to acclimatize.
As you ascend to 12,500 feet over the next two days, it’s important to keep your body well-hydrated to keep the symptoms of altitude sickness at bay.
Acute mountain sickness is important to know before embarking on a high-altitude hike. You can learn more about it and take appropriate precautions in this video. AMS is commonly seen when trekking the Himalayas. Taking Diamox the day before hiking can greatly reduce the chances of AMS.
So try to drink 5-6 liters of water a day. Drink water right after you wake up, while trekking, and before going to bed.
Emergency communication is difficult as most of the road to Sankri has no mobile phone service. If you’re hiking with a group, chances are they have a walkie-talkie that connects you to base camp where you can reach them by cell phone.
HIKE PREPARATION
Whether the hike is easy or difficult, high-altitude hikes require preparation.
Fitness
Days 1 and 2 of the Kedarkansa trek are very easy. But on summit day, leave the huffs and puffs behind and wish you had more stamina! Be sure to jog at least a month or two before your trek. You should be able to jog 4 km in 25 minutes.
In addition to jogging, do some stretching exercises to strengthen the thigh muscles. Also, do some stretching so you don’t get stiff. In particular, work on stretching your shoulder muscles so that you can comfortably carry a backpack on a hike. This allows for comfortable hiking. This video will show you how to prepare.
Speaking of backpacks, let’s talk about what Kedarkantha needs for his treks.
His most important trekking equipment in the highlands to bring on the trek is good trekking shoes, a comfortable backpack and warm clothes.


Starting a new life is a thrilling but hard responsibility. Whether you’re moving overseas for personal, professional, or moot details, altering to life as an expat takes careful planning. We’ll cover many aspects of emigrant life in this full guide, giving helpful vision and useful information to help you get the most out of your time away.
Being an expatriate, or living overseas, is an exciting and difficult adventure that leads to fresh knowledge, cultures, and views. Whether you’ve chosen to go abroad for a job, learning, or personal development, adjusting to the difficulties of living as an expat demands mobility, courage, and an open mind.
This area provides expatriés with the required equipment to safely settle into their new homes, from navigating public transportation to using essential amenities.
Getting Ready to Move
Much preparation is necessary before you arrive at your new location. Everything from documentation and visa requirements to speaking ability and cultural acuity are addressed in this section. Knowing the practical aspects of moving can reduce stress and make it a seamless transition to living abroad.
Getting Started
Although moving to new work can be daunting, you can comfortably adapt if you know what to do. We’ll talk about getting a place to stay, creating a support system, and getting informed about the services and amenities that are offered by the area. Studying the essentials of daily life in your host nation, from procuring food to using subways, makes for a positive expat experience.
Developing Cultural Intelligence
Living in another country and seeing its culture is one of the most enjoyable parts of living overseas. Besides addressing the value of cultural ability, this part provides advice on how to promote intercultural understanding. Learning how to adjust to and take different facts of view recovers your expat experience and helps you build permanent networks with residents, from knowing new duties to greedy cultural shades.
Taking Care of Financial and Legal Issues
Taking care of the economic and legal positions of moving overseas takes careful preparation and attention to detail. We’ll go over things like international banking, taxes, health care, and insurance choices. Knowing the fiscal and legal terrain of your final nation is a must to protect your welfare and promise compliance with regional statutes.
Sustaining Emotional Health
Living far away from home can at times seem difficult or isolating, but if you want to thrive as an expat, you must put your emotional health first. This section provides tips on how to deal with cultural shock, deal with a feeling of home, and get help when you need it. Maintaining your mental and emotional well-being increases your resilience and happiness with living abroad, whether you choose to do this through hobbies, self-care routines, or relationships with other expats.
Taking Growth Opportunities
Living overseas has its challenges, but there also exists unequaled chances for both professional and private growth. A life-changing experience and lasting recollections can result from accepting the possibilities of your expat journey, whether it is by learning new skills, increasing your international network, or going to new places. You are urged in this part to embrace confusion, push yourself outside your comfort zone, and take benefit of any opportunity for growth.
Conclusion
Keep in mind that every step of your expat experience presents an opportunity for growth and education. Through careful planning, gaining cultural sharpness, and putting your health first, you can face the difficulties of living overseas with strength and self-assurance. Savor the diversity, treasure the moments, and enjoy the excitement of living overseas.
Organizing a wedding is a big outlay. Although it is once in a lifetime and you think it is worth it, there are also ways to reduce expenses. If you do not want to skimp on the banquet, you can do it with the honeymoon. And enjoy a honeymoon on a budget.
It is not necessary to choose a very expensive destination if it is not the moment. You will have time to make that trip in all that life together that awaits you. Nor do you carry souvenir bags for all your friends and family.
So, can you have a great honeymoon for little money? Of course!
In fact, the most expensive trips are not always the most enjoyed. Surely your parents or grandparents settled for a weekend away from home or a few days in the Canary Islands or Mallorca. And they have an unforgettable memory that they have told you over and over again.
A closer destination
Some couples believe that the further they go, the better the honeymoon will be. And that is not true at all.
It is true that there are incredible places on the other side of the planet. And probably your dream is to cross the pond even if you have to spend more than 10 hours on a plane.
However, the travel budget is more expensive due to transport costs. And logically, the further, the more it will cost.
If you now have a limited budget for your honeymoon, think about closer destinations. In Europe, there are countries with a lot of charm and perfect for a few days of relaxation, culture, or adventure. And even Spain has corners to discover that would surely surprise you.
Shorter vacations
The more days you are traveling, the more you will disconnect from everything. It is another myth that is not always fulfilled.
Some newlyweds spend two or three weeks getting to know the world. In the end, they arrive more tired than they left and do not enjoy it at all.
In a few days, you will be able to rest and enjoy yourself a lot. Of course, try to take at least a week, especially if you are a few hours away by plane.
Two trips are preferable. One after the wedding and one later than spending it all at a destination.
And if you have a low budget, your pockets will appreciate it.
Set a spending cap
We all know that the cost of travel is not just the price of the hotel and transportation.
Once at the destination, we usually make purchases, excursions, and other superfluous expenses that in the end double the initial cost or even more.
If that’s going to be a ruin, it’s best to set a maximum you can afford. It is not necessary to buy gifts for everyone. The trip is for you and the rest do not need to bring anything because it will also be noticeable in the weight of the suitcase.
Avoid the high season
Celebrating a wedding in the summer has many advantages. But also a drawback when it comes to the honeymoon.
And it is that in most destinations it is high season, and therefore, the prices are higher. A good option, if you want a specific place, is to postpone the trip for a time that is cheaper. That as long as the weather does not prevent it. In the off season, you can get good deals even on luxury rentals like Jamaica Villas. Sometimes, it is better to leave those days for later and after the wedding to focus on other things such as enjoying that new stage.
Organize it on your own
Have you thought about looking for everything on your own? Travel agencies provide security and in this type of trip many prefer not to risk.
But it is also true that these companies have to charge because they make a living from it. And also, everything that bears the nickname “honeymoon” or “honeymoon” is always more expensive.
If you are smart with tracking and shopping on the Internet, you can search for everything without hiring an agency.
It’s more of a hassle and involves time that you probably don’t have but you can also save a lot. Perhaps a friend or brother who is used to traveling a lot can help you. Or do it ahead of time before getting into the last-minute wedding preparations.
These are some ideas to fully enjoy a honeymoon despite having a limited budget. And if you still decide to postpone it, don’t worry. The important thing is the new stage that you start as a marriage. And that is priceless.

A honeymoon is a time for couples to enjoy each other’s company somewhere they can relax and have fun. This is a great time to enjoy the good things in life in the company of your loved one. That is why picking the perfect place to go is a crucial task to truly enjoy your time off. In this article, we list down some of the reasons why South Africa’s beaches should be where you spend your precious honeymoon. Ready? Read on!
Coffee Bay Beach
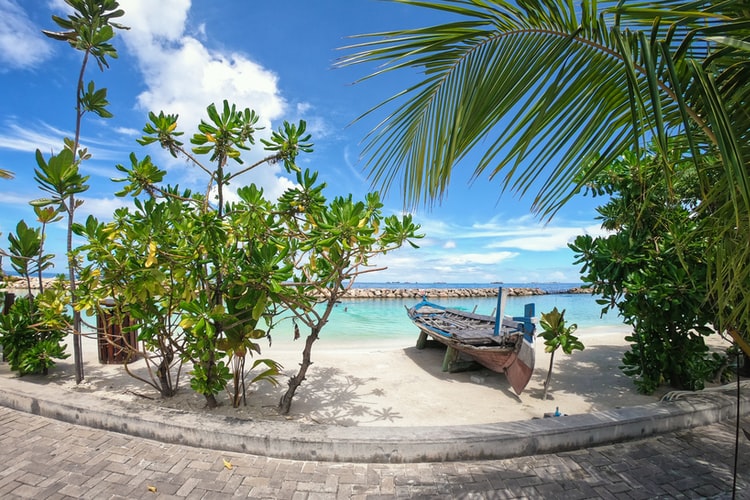
Located in South Africa’s Wild Coast, Coffee Bay Beach is a serene and subtle paradise perfect for newlyweds. This quaint stretch of pristine sandy beach is surrounded by scenic rolling hills and idyllic landscapes. A great way to spend a few days with your significant other just relishing in each other’s company.
Coffee Bay Beach is part of the rural town of Coffee Bay. It is located in the Eastern Cape Region of South Africa which the famed Nelson Mandela came from. Surfing is one of the best ways to enjoy the beach. The Wild Coast—where the beach can be found—is known for having consistently good surf. If you enjoy something calm and relaxing, a stroll through the mostly empty beach is the one for you.
Boulders Beach
Another hidden gem in South Africa is Boulders Beach. This pocket beach is named after two granite boulders that form an inlet. This small patch of powdery white sand is known for its tiny residents frolicking about. The beach is home to African Penguins native to Africa’s southern coasts (Namibia and South Africa). This small colony has settled in this small patch of the sandy beach back in the 1980s. Since then, the beach is designated as a protected area where the birds can live in peace.
Boulders Beach is a unique experience where you get to see real live penguins in action without needing to travel far. It is also close to most establishments with regular amenities nearby. If you and your partner love these adorable creatures, this beach is a must-visit.

Camps Bay Beach
Hailed as one of Capetown’s very best, This picturesque beach is postcard material. Camps Bay has some of the country’s best views. The white powdery sands meet the azure blue waters. Behind it is the majestic Twelve Apostles mountain—which is a part of the Table Mountain Complex in Cape Town. A few steps from the beach are the idyllic suburbs that add to the area’s rustic coastline vibes.
The beach is best known for its stunning sunsets which tourists from far and wide come to witness. The beach is one of the most popular during Valentines Day where couples from all over come to enjoy the romantic scenery and each other’s company. If you and your partner feel a bit romantic and don’t mind the crowd, Camps Bay Beach should be on your list.
Hout Bay Beach
This is another great beach in Cape Town. This seaside town, though residential, still maintains its rural vibes making it an idyllic coastal escape. The bay is known for its harbor which is one of the busiest fishing ports in the region. Here you get to see the Hout Bay Yacht club and a burgeoning food scene with its many restaurants.
Hout Bay Beach also has a well-known sand beach where locals and tourists alike come to enjoy the cool waters. As a natural bay, Hout Bay Beach is sheltered from the huge waves unlike other beaches in South Africa. Because of this, more laid-back activities like stand up paddleboarding are quite popular.
Stand up paddleboarding or SUP is a sport that combines the mobility of a kayak and the freedom and flexibility of surfing. This boardsport originated in Hawaii in the 20th century. It has then spread throughout the globe as its popularity grew. Because it can be enjoyed without waves, SUP is a great bonding activity with friends and family. It is easy to learn making this sport widely accessible. You can also enjoy SUP by incorporating yoga in it. If you love yoga, you need to try SUP Yoga. It is a great water sport that can help improve your fitness level and your health too.
Kraal Bay Beach
This quaint beach is another peaceful and calm beach perfect for some alone time with your SO. Located in the Langebaan Lagoon in the Western Cape, the beach is part of the bigger West Coast National Park. Though the park is a popular tourist magnet, Kraal Bay isn’t as crowded as the other popular beaches in the country.
The lagoon is perfect for fishing and angling, kayaking, stand up paddleboarding and Kayaking. The area is also frequented with houseboats most of the year. All of which adds to the calm and tranquil charm of Kraal Bay.
Kogel Bay Beach
In South Africa, you never run out of breath-taking beaches to discover. One of which is Kogel Bay. Kogel Bay’s name in Afrikaans, Koeelbaai, means Cannonball Beach which is said to be a reference to the small round stooges scattered along the beach. The beach is a bit on the rugged side with minimal development. But it more than makes up for it with its sheer natural beauty.
Along the beach are several caves where you can set up camp to hide from the harsh sun and strong winds. With the winds come huge waves perfect for surfing. Swimming is highly discouraged though as there is a strong current that can sweep inexperienced swimmers off course. If you love spending some alone time with your loved one amidst the wild beauty of nature, this is a great choice.
Muizenburg Beach
Last but not least is one of South Africa’s famous beaches, Muizenburg Beach. This incredibly long stretch of white sandy beach forms part of the False Bay Coast. This Family-friendly is one of the country’s Blue-Flag Beaches. Due to its popularity, many establishments have set up shop in the area. This makes it a great way to experience the beach without going far from civilization. Learn to surf in this world-class beach or see the colorful Victorian beach cottages that line the shore. Whichever kind of adventure you and your partner seek, you will surely find it here in Muizenburg.
-

 Social Media10 months ago
Who is Rouba Saadeh?
-

 Apps10 months ago
Why is Everyone Talking About Hindi Keyboards?
-

 Social Media10 months ago
Mati Marroni Instagram Wiki (Model’s Age, Net Worth, Body Measurements, Marriage)
-

 Entertainment10 months ago
12 Online Streaming Sites that Serve as Best Alternatives to CouchTuner
-

 Apps10 months ago
Things you need to know about Marathi keyboard today
-

 Apps10 months ago
Stuck with Your default Bangla keyboard? Isn’t it time for a change?
-

 Entertainment10 months ago
Movierulz Website: Movierulzz 2021 Latest Movies on Movierulz.com
-

 Social Media10 months ago
Brooke Daniells: Everything About Catherine Bell’s Partner